Whether you’re securing a home, retail store or other commercial business, you need dependability from your systems.
Intelligent intrusion detection is a delicate balance between responding to real security breaches and ignoring costly false alarm triggers.
The motion detector chosen ought to suit the requirements of virtually any application – from easy to difficult environments – and stand up to multiple challenges, including strong drafts, moving objects, and the presence of pets.
Residential
Sometimes it is necessary to protect a kitchen with a motion sensor. For these
However, although dual technology detectors are better suited to unstable environments, they are not immune
Homes and businesses which do not employ any form of security measures are 10 times more likely to be burgled than those with simple security measures
- Homes and businesses with no burglar alarm are three times more likely to be broken into than those with alarms.
- Around 20% of all house burglaries are carried out without forced entry. A burglar may see an open window or
other easy point of entry and take their chance. - Visible burglar alarms make intruders think twice. They not only act as a
deterrent, but will also provide a warning that an intrusion is taking place.
There are various reasons for adopting a trap protection strategy.
- The first is
to limiting the false alarm potential of an alarm system. All detectors (even the top of the range ones) sometimes causefalse alarm. This is becoming an increasing problem due to thehard line Police forces now take regarding attendance. False alarms result in a withdrawal of Police attendance and the more detectors a property has the higher the false alarm potential. - Another important reason is cost – if using a good quality sensor it would be expensive to protect each room.
Features of excellent motion detectors
- They feature Microwave Noise Adaptive Processing to easily differentiate humans from false alarm sources, such as a ceiling fan or hanging sign.
- For increased reliability, dual sensors must process the PIR and microwave signals independently and must agree there is an alarm before the relay activates.
- There must be sealed optical chambers to prevent drafts and insects from affecting the detector, and our pet-friendly models rule out motion from family pets or guard dogs, so you only handle valid alarms.
- The detectors must integrate and process data from up to 6 different sensors to make intelligent alarm decisions.
- It provides the best analysis of disturbances and adjusts to the background for ultimate false alarm immunity.
Intrusion Alarm Control Panel
Features
- The panel should be capable of handling wired detectors as well as with wireless detectors.
- Ultimately, an alarm system gives property owners the peace of mind they desire to protect their homes, families, businesses and assets.
Components of a burglar alarm
The intruder system comprises detectors, control panels and communications devices.
Detectors identify and react to specific occurrences including movement, shock, vibration, smoke, heat, and flood.
Different types of detectors are available, each protecting different aspects of the property. These include:
- Passive infrared sensors (PIRs) detect people moving using infrared heat sensing,
- Dual Technology sensors use combined infrared and microwave sensing technologies to help reduce false alarms,
- Magnetic door contacts detect the opening and closing of doors and windows,
- Glass break sensors listen for the specific noise of breaking glass,
- Shock sensors detect attacks on doors and windows,
- Smoke sensors can be connected to the intruder alarm system to detect fire.
The control panel

It is the brains of the system to which detectors are connected.
It analyses and actions signals from detectors and is operated by a keypad. Keypads are sometimes integrated into the control panel e.g. Optima Compact, or these can be remote with LED or LCD displays. LED keypads communicate alarm system status using LED indicators.
LCD keypads use text displays to give a fuller picture of the alarm status including event logs, entry and exit times of users, and ultimately enable speedy identification of alarm sources. Control panels come in different shapes, sizes and complexities depending on the type and size of property to protect.
- Number of zones (areas) to protect.
- Ability to set all or part of the system.
- The number of Remote keypads it can accommodate.
- Event memory log PA & Tamper inputs.
In the event of alarm activation, the keypads identify the problem & inform the occupants of the cause and location of the alert.
DETERRENTS
- Sounders and sirens use different tones and rhythms to communicate the type of alarm internally and/or externally.
- Externally mounted sounders and sirens are a good visual deterrent for potential intruders and quickly alert property owners and neighbours to an intrusion. The strobe helps to identify the house when an alarm has gone off.
ALERTS
- Communications devices such as the Informa speech dialler send pre-recorded voice messages by telephone when an alarm is triggered. These messages can be sent to the homeowner or nominated contacts either via land line or mobile phone.
- This is particularly useful for isolated properties and allows action to be taken when property owners are away from home.
Planning and laying out an intruder alarm.
Step 1: Conduct a site survey with your customer
To ensure that you get the correct intruder alarm system for your customer, you need to carefully plan and design the system. This is achieved by conducting a short site survey in consultation with your customer.
The location survey comprises two stages:
- A risk assessment of the building content – the total value of target items (electrical goods, jewellery and so on) will generally indicate the level of security required.
- A risk assessment of the building’s fabric and structure – how easy or difficult it might be to wire the entire the building, the level of physical security, location, break-in history and so on.
- The technical survey looks at those factors than might influence the choice and design of system and the final system design proposal. It will look at any aspect that might impact on the performance of the system such as electrical interference from local plant or machinery.
- The grade of intruder alarm system will depend upon the performance required as determined by the location survey.
The following questions will help you identify exactly what your customer wants to protect, and will enable you to map out the system plan and identify the most suitable components.
The site survey
- Is the property isolated or in a built up area?
- What parts of the property have to be protected? Does the entire property or just part require to be protected? What areas does the customer want to protect to identify the number of zones required?
- How many entry doors exist at the property and that require protection?
- In addition to intruder protection, does the customer require fire protection?
- How many zones will be required?
- What type of keypad does the customer require (integral, LED or LCD)?
- Does the customer require additional keypads?
- Where will the control panel be located?
- Does the customer require the windows to be protected?
- How many rooms are to be protected with movement detectors?
- Does the customer have pets that will remain in the house when the system is set?
- What type of alert is required? (Sounding/visual/remote phone communication)?
- Where will the external siren be located?
- Is a dummy siren also required?
- Is keyfob operation more suited to the household?
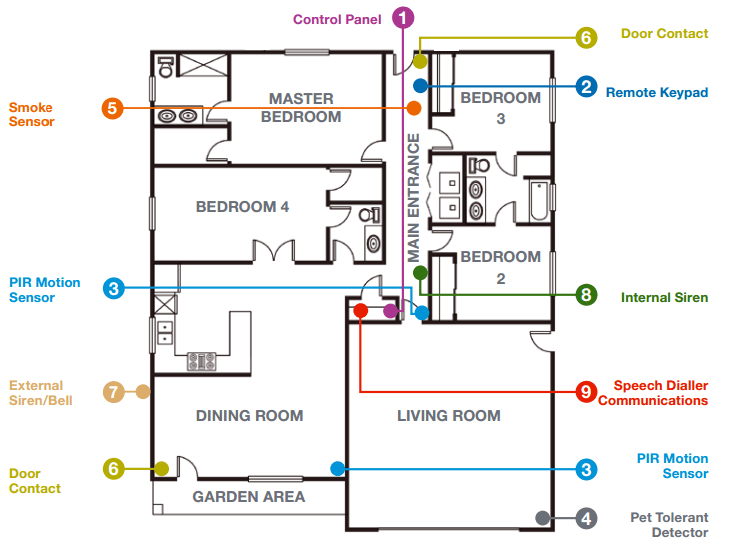
Step 2: Map out the property and select products
Using the information you have obtained during the site survey, map out property layout and select the most appropriate products for the installation.
Step 3: Decide where to position the Intruder alarm system components
- Control Panels
Positioning
- For control panels with onboard keyboards such as Honeywell’s Optima Compact, these should be installed near the main access point in a convenient location for mains electricity supply and for user operation
- For control panels which are operated using remote keypads, such as Honeywell’s Accenta Mini, the panel can be concealed inside a cupboard or loft space in a convenient location for mains electricity supply and it makes the cabling to the sounder much easier.
Best Practice
- It is best to install the control panel first.
Hints and Tips
- Check the panel voltage to ensure that the control panel has power. REMEMBER to disconnect power before proceeding with the installation of peripherals
- Remember to link out any zones that you are not using, you need to use a wire link across the unused zones
- The stand by battery can take several hours to charge up so it is a good idea to charge batteries before commencing the installation.
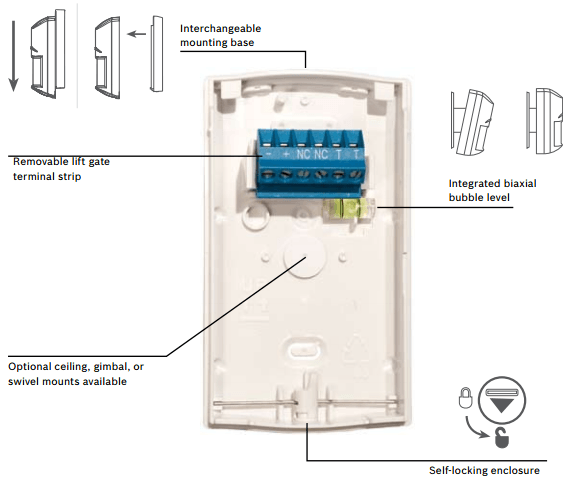
Remote LCD or LED Keypads
Positioning
- Mount in a convenient location which allows easy operation for the system users, typically close to the main door, back door and master bedroom.
Hints and Tips
- Remember to check that the tamper spring on the keypads is closed
- It is recommended to use the tamper spring whenever the keypad is mounted against a wall so that it is triggered if an attempt is made to remove it.
- PIR Motion Sensors
Positioning
- Install the sensor at a height of 3m-2.7m
- Avoid direct or reflected sunlight remembering that the sun moves around during the year!
- Position the sensor away from windows and heating/cooling devices such as radiators and fans.
- The sensor must have a clear line of sight to the
protection area.
How to avoid
Where the PIR has a look down or “sneak” zone, ensure that this is not obstructed
- Pay attention to avoid blind spots when positioning sensors
- Always adjust the sensitivity of each sensor once it is mounted, taking into consideration the lighting, the proximity to radiators, windows, mirrors and other external influences
- Tamper switches often cause problems. If you are using the tamper switch ensure that the tamper switch is closed. If you are not installing the tamper circuit (not advised) you need to ensure that the tamper circuit is linked out at the control pane.
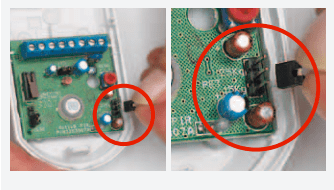
Hints and Tips
If
- Using the black jumper, you can easily set the red LED light to ON or OFF as indicated below. This is particularly useful in living rooms where the LED flashing on and off could be distracting.
- Allow up to one minute for the PIR to calibrate itself.
Pet Tolerant Detectors
Positioning
- Follow the instructions for positioning PIR motion sensors.
- Select
correct pet tolerant setting using the black jumper as indicated below.
Smoke Sensors
Positioning
- Place in or just outside bedrooms or in the hallway close to any sleeping area. The top of the stairs is also a good place
Hints and Tips
- Do NOT place smoke sensors in kitchens or bathrooms.
Door Contacts.
Positioning
- Mount the main part (
part with connectors) on the fixed part of the door or window frame. Do not mount them further than 3” from the opening side of the door - Mount the magnet on the mobile part of the door or window so that it is adjacent to the main part
- Ensure that the two parts are opposite each other and a small gap has been left Hints and Tips
- Ensure that wires are hidden so that they cannot be damaged
- Ensure that wires are hidden so that they cannot be Please note that some Honeywell door contacts have two rather than five terminals
- If there are only two screws, a tamper loop will need to be created by twisting the cables then insulating them with electrical tape
- Wrap the wire around the screw in a clockwise direction and tighten the screw for the best connection.
External Sirens & Bells
Positioning
- Install in a high location from which the strobe can be seen and the siren heard.
Hints and Tips
- Ensure that the tamper is closed.

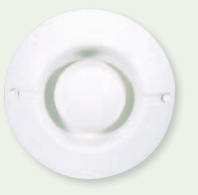
Internal Siren
Positioning
- Place in the centre of the home out of reach.
Speech Dialler Communications
Positioning
- Locate where it can be easily operated by system users and in a convenient location for connection to the phone line.
- If possible, do not connect other telephone apparatus to the same line.
Best Practice
- Connect the speech dialler directly into the control panel.
- Once wired in,
test that the dialer dials through before programming the pre-recorded alert messages according to trigger cause (e.g. intruder, fire, and flood).
How to avoid the common mistakes with installing a speech dialer
- Ensure that the speech dialer is the first item on the telephone line i.e. the first “slave socket” to be connected to the master socket (where more than one apparatus is unavoidable). This allows the speech dialer to “snatch the line” or disconnect any other call should it be triggered.
Installation Advice and Best Practice
- When installing an intruder alarm it is imperative that you follow the necessary Health and Safety requirements according to The Electricians Guide to the 17th Edition of the IEE Wiring Regulations. Installation of the intruder alarm is straight forward provided that the installer is a qualified and experienced electrician.
General hints and tips
- Use multiple core alarm cable and decide at the outset which colours you will use – Convention suggests red is live (+12V) and black is negative (0 Volts)
- Remember to “tin” the wire
- Do not over tighten the screw on the connector block as this can shear the wire.
- When using the global tamper circuit, this is a continuous loop through all zones (contacts, PIRs PA devices etc.) so all tampers need to be wired.
- Do not work using live circuits
- Run the wires to all the locations of the peripherals.
- Mount the control panel in the desired location.
- Mount the keypad on the wall in the location agreed with the customer.
- Wire up the peripherals (detectors, bell boxes, communication devices…etc.)
- Activate the power.
- Carry out a walk test and check the system is working.
Once you have installed the Intruder alarm system and verified that all components of the system have
Programming and Commissioning the Intruder Alarm
Programming and commissioning the intruder alarm system really means establishing your customer’s requirements, programming the system to meet these requirements and then commissioning the system to ensure it works.
- Test the control panel, keypad and all peripheral devices to ensure they are working.
- Programme the control panel according to the requirements that you agreed with your customer’ There are different programs for different types of programme setting.
Types of Alarm Systems
Audible Only alarms
This is generally the most basic option. If the alarm is triggered, an audible alarm sounds to alert you (or a neighbor) that an intruder has entered (or is trying to enter) the premises. This type of system may be appropriate for most typical dwellings. However, it depends on the location of the property, the lifestyle or nature of the occupier or the content.
This will be a cheaper option than having a fully monitored system.
With a Speechdialler, when the alarm is activated, pre-programmed numbers of your choice will be
A GSM alarm unit sends you and/or other contacts a text message. It is not dependent on the phone line. It can typically send a text to up to three numbers, there is no
Under no circumstances are police telephone numbers allowed to be programmed into the auto dialer.
Monitored systems
The system installed may be the same or similar to an audible only system, except that when the alarm is activated, a signal informs a remote monitoring centre. They may confirm that the alarm is not false and if necessary then inform the police. A unique reference number (URN), which identifies the premises must be obtained by the installer from the police when the system is installed. To get this number, the installer and the monitoring centre must be registered with a certification body.
Monitored systems do not guarantee a police response, which is governed by their workload. If
In Summary,
WHAT DOES AN ALARM SYSTEM CONSIST OF?
Regardless of the size, type, complexity, or sophistication of the Intruder Alarm System that you might require, it will consist of three basic but distinctly separate sections:
- The CONTROL equipment.
Now called ‘Control & Indicator Equipment’ under the European regulations
- The WARNING equipment.
- This is the part of the system that signals the presence of an intruder or other emergency. This includes the bells, sirens, electronic speakers, flashing lights etc. Any of which may be used to provide what is known as ‘Local Audible Warning’. Like Control equipment there are many different types of external sounders in all shapes, sizes and colours. Electronic sounders that produce a sound similar to a Police-car siren.
- The
control unit will operate on mains derivedalthough the actual alarmpower-cut ‘ the systemis fitted with arechargeable battery that will take over and operate the system for a), until main’s power is restored. When the mains supply is restored, it will automatically recharge the battery.
REMOTE ALARM MONITORING
Under certain circumstances and for specific security implications it might be desirable for your alarm to do more than provide ‘Local Audible Warning’ only. Specialist equipment incorporated into the control equipment can be used to signal that your alarm system has activated, to a third party. In most cases this is achieved by using the Public Telephone network to signal to a privately operated ‘CENTRAL STATION’ (Alarm Receiving Centre) who have a direct line with Police.
‘ALARM RECEIVING CENTRE’
Our Alarm Receiving Centre (previously called a ‘Central Station’)
This equipment is able to distinguish between an ‘Intruder’ signal and a signal caused by the activation of a ‘Panic Button’.
Costs involved in this service include an annual ‘Monitoring Fee’ payable to the Alarm Receiving Centre.
- The DETECTION devices.
MOVEMENT DETECTORS
- The most common method of intruder detection today is the movement detector, of which the ‘Passive Infra-Red’ movement detector is the most common.
- Typically the P.I.R. Detector is about the size of a cigarette packet and is mounted in a room to provide “Volumetric” protection to that area. Unlike
the other types of detectors includingit is ‘Passive’ that means that it is not sending out any ‘signal’ or radio -wave that can be the subject of various types of interference and resultant false alarms. - The P.I.R. Detector monitors the level of Infra-red radiation within its field of
view, and detects the increase caused by example, by someone walking into the room. - Although P.I.R. Detectors are suitable for most applications, if the environment is not conducive to P.I.R. technology, then there are ‘Dual-Technology’ detectors,
which incorporate I.R. anda second type of detector, normally Microwave, which together providesa very high immunity to false alarms.
DOOR CONTACTS
- Perhaps the oldest and most well-known detection device is the magnetic ‘Door Contact’. This comprises of a magnetic reed switch fitted in a door frame with a magnet sited alongside it in the actual door. When the door is opened and the magnetic field removed from the area of the reed switch, then the alarm signal is generated.
- Use of these switches today is normally limited to the final exit door (Front door) to provide an indication to the control unit when the ‘User’ leaves the premises, thus activating the Exit/Entry warning tones.
BREAK-GLASS DETECTORS
- These
units are basically aspecial microphone and amplifier that are tuned to the specificfrequency to that generated by breaking
INERTIA DEVICES
- There are numerous types of Inertia or vibration detectors available that are able to react to ‘vibration’ associated with forced entry into Electronics within the units are able to filter out normal background disturbance and determine when the device registers a sudden increase in vibration that might be associated with the violent vibration caused in forcing a window open against its frame etc.
PERSONAL ATTACK BUTTONS
- These buttons are connected to your alarm system and are ‘Active’ at all times, even when your alarm system is not ‘Set’.
- In the event of an
emergency they can be operated to cause a full alarm condition. They are most frequently sited adjacent to the front door or adjacent to a bed. - A much more flexible Personal Attack facility utilizes a small radio transmitter, which is about the size of a cigarette packet. This button can be used to send a radio signal to a dedicated receiver to operate the alarm from anywhere within the protected premises or grounds, (typical range about 100 metres). This of course means the Personal Attack alarm can be activated from any part of your property without the requirement of having to be in reach of a fixed, wired button.
- This
system has obvious advantages to people living aloneas it may be taken with you if youfor example, to protect you when returning to the premises if you need to negotiate a dark or secluded area before entering your house. - If you feel vulnerable and intend to open the Front door at night, or go out to your car or put the rubbish out, you can carry the transmitter in your hand for instant operation!
- If
your system hasto our Alarm Receiving Centre, PersonalAttack alarm signals are normally ‘transmitted’ silently.
RADIO ALARM SYSTEMS
- The
use of radio forButtons has already beenpossible to have anAlarm system that relies totally on radio to enable the detection - Small radio-transmitters are placed inside, for example, P.I.R. detectors along with a battery. If activated the signal is transmitted to the control unit, which incorporates the radio receiver
- The
system is still connected to themain’s electricity supply and the externalsounder and the Operators Keypad are still ‘Hard-Wired’ but all other parts of the system are ‘wireless’. - The most obvious advantage of this type of system is the fact that with the absence of wires, it is often possible to achieve a neater installation. (Although it goes without saying, we always endeavour to achieve the neatest possible installation and conceal the wiring wherever practical).
- Another advantage would be that outbuildings like garages etc. could be included on the system without the problem of having to run cables externally.
- Broadly speaking a complete radio-alarm installation will cost a little more than an equivalent, ‘hard-wired’ system, due to the additional technology built into the sensors etc. The system will also need to have new batteries fitted periodically, (normally annually) in each of the transmitters. Radio systems are becoming increasingly popular among people who have homes in which it is virtually impossible to hide wiring and prefer the neatness that radio devices allow.
This is a helpful system to enhance the security of a home or a business building You have covered every aspect of the design so well that electrical and electronics students designing projects on these particular area can make a reference to.